
Finally! My first Japan post! As per tradition, will first blog about how this whole trip came into fruition, as well as some important tips about planning, packing and cutting down costs. After all, I am a self proclaimed budget traveler! Will try my best to go into details in the hopes of helping out some of you who wants to visit the land of the rising sun with a limited amount of budget. So, how was I able to book our plane fares & accommodations for just more or less P13,800 each? And how was I able to spend just P25,000 for 8 days? Read on...


It was more expensive than the original fare (because if you book Tokyo-Manila it's not included in the promo na and it will be in Yen) but still cheaper than taking the bullet train.;)

After booking our tickets, on the first week of June, we had to cram and work on our visa application. Ana had been to Japan na, so I decided to just apply sa agency where they got their visa before. She told me that's where Tricia Gosingtian also applies for visa. And you know how often Tricia goes to Japan, so I know the agency must be good.

I don't have an updated ITR ever since I started working freelance. That means, I also don't have a payslip and Certificate of Employment which you need when applying for a visa. Friendship tours was kind enough to guide and assist me. So what documents did I submit?

Before submitting our visa requirements, we decided to finalize and book all our accommodations. For this trip, we booked through Airbnb. In our selection, we considered our budget, the price per night, the location, accessibility, the amenities and if it could fit 3 people. We were having a hard time agreeing at first because of our budget & restroom requirements, so I took the liberty of choosing the most promising among the list and then had it approved by the girls. Sarah requested a private bathroom for all accommodations but I had a hard time looking for a budget friendly place in Kyoto, so we booked a place with a shared bathroom. I think she only found out about it when we got there. Haha! Sorry bebbb! Peace.


We wanted to experience traditional Japanese style tatami rooms (with mats on the floor) so we decided to book this one. Rooms or apartments with ensuite bathrooms are expensive so decided to give this a go. We have faith naman that Japan's shared bathrooms are clean. Hehe.


This might be one of our best finds in Tokyo! Ab's place is in Shibuya, walking distance to the train station and Shibuya crossing. It's in the heart of the city but is located in a quiet street. For the price, it's quite a gem!:)


Imagine, we only paid P6,337 each for 6 nights! We were able to save 1 night accommodation when we took a night bus from Kyoto to Tokyo;)


So instead of riding the bullet train (or Shinkansen train) going to Tokyo which is priced at 14,000yen, we decided to take the night bus for 6,800yen to save on 1 night accommodation na din. That's P7,000 vs P3,300. Huge savings!:) The travel time is longer (8 hours vs 3 hours) but in our case, we didn't really mind it because the bus was such a winner plus the ride was super smooth. We immediately fell asleep upon loading and when we woke up we were already in Tokyo! We didn't even avail the toilet inside the bus. Haha!

We booked our seats via Willerexpress.com. It was recommended by our fave kawaii blogger, Ashley Dy. :) Thanks Ash! She also advised us to book ahead of time because they don't do on-the-spot bookings. After choosing your travel dates and routes, you could sort the result according to price (which I did), arrival times, departure times. Cheapest bus fare I saw was 3,000+yen, and most expensive was 10,000+yen.


In a world full of Fuji, be a Canon EOS M3. Haha! Well, to be honest I don't have a camera now haha. I usually just use my iPhone 6 to take photos. For this trip, Sarah let me borrow her husband's (Hi Papa D love you! Haha) camera which is a Canon M3. I fell in love with it! Super nasepanx ako. Huhu. I love the resolution and how it's super user friendly. It also has wi-fi, meaning you could transfer photos to your phone. If I would buy a new camera, this would be it. :) It might be slightly heavier than a Fuji but it's still very compact and easy to carry around.


I deleted na my Shoebox App on my phone to save space. Don't worry, the downloaded photos will stay there forever (I hope). Then I opened the Shoebox website using my laptop, signed in and downloaded all my photos from the trip! :)
No need to bring your laptop na when you travel just to transfer photos and free up some space on your SD card or phone. Yipee.

I've always had this fear of running out of money and begging on the streets in a foreign land, so I make sure I bring enough to survive. Mas okay nang sobra kesa kulang db? For this trip, I had P50,000 exchanged at Sanry's money changer in Shoppesville, Greenhills. I researched online and read in some forums that they have nice rates. You could buy Yens from banks like BDO and BPI but you have to order them 2 weeks before. And you have to provide documents. I didn't have time so Sanry's it is!


I've always had this perception that Japan is an expensive place to travel to. That I had to bring at least P70,000 to survive. I was wrong!!! At the end of our journey, I was able to take home 50,000yen (I brought 110,000yen) pa with me. Not counting the 3,000yen I lost and the 1,000yen Nico found in my dress haha. So that means, I only shelled out 56,000yen or roughly P26,000!!! That's for 8 days na, 3 cities! I still couldn't believe I did it. And no, I didn't deprive myself haha. I was able to eat well, and that also includes train rides, entrance fees, 3-day Tokyo subway pass and a little shopping! :) More details on my next posts!

In Osaka and Kyoto, we bought train tickets per destination. I think it was okay because if we bought the http://www.japanrailpass.net/ which was more or less P13,000, it might not be worth it. I think our train rides didn't amount to that naman. We were not able to go to many places in Osaka & Kyoto coz of time constraint.

FOOD - I like Japanese food but my selection is every limited. I like gyoza, I like katsu, ramen (but can't finish them), miso soup, but I hate sushi or raw anything. I also don't eat roe or fish eggs. Anything malansa, I hate. Fried is okay. Haha. So when I was there, I only ate what was familiar. I am so corny but I didn't want to waste money on food I won't be able to eat or finish. Food could be pricey in Japan, but they also have a lot of budget friendly meals and food places!

TOURS - We agreed not to go to amusement parks (which costs 3,000+yen) and most of the sites we went to does not have an entrance fee. If there's a fee, it's very minimal. :)


The tatlong bibe + Glico Man in Osaka
1. PLANE TICKETS
They have an on-going seat sale promo! Goooo!
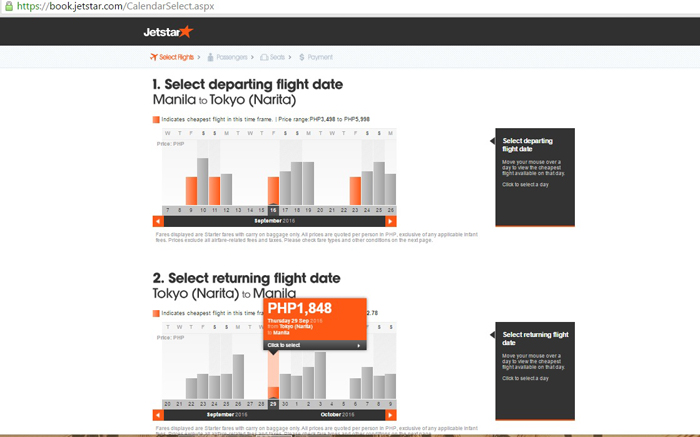
So, why Japan? Well, it all started when last February Jetstar announced an online seat sale as an introduction to their new Japan routes. Got an email (I subscribed to their newsletter years ago since I use Jetstar for Singapore flights) and I immediately checked it out. HOLY MOLY! I couldn't believe that round trip fares were as low as P4,800!!! I sent the screenshot to our viber group and immediately, Ana and Sarah came on board. Book it! They said. Hehe. They had limited seats and specific dates for the promo. The earliest travel dates were March & April (cherry blossoms galore!) but we wanted more time to save up so we opted for June. I know, I know the date's not ideal because of the rain but we still took our chance. Sanay naman kami sa Pilipinas na laging umuulan. Haha.
I love how they have a monthly view! Less hassle. Look, I found a P1,848 fare from Tokyo-Manila! You could view agad the cheapest fare.
They have an on-going promo! P3,696 lang o roundtrip Tokyo! Gooo.
Since it's Sarah & I's first time in Japan, we decided to hit 3 birds with one stone. Our original plan was to book the Manila-Tokyo-Manila flight for P4,800, but we also wanted to check out other areas like Osaka and Kyoto. If we go with our original plan and just ride the bullet train to Kyoto, we'd have to spend more or less P15,000 just to get back to Tokyo 'coz that's where we'll be flying out. So we reached a consensus and decided to book one way Manila-Osaka, and one way Tokyo-Manila. Our jump-off point is Osaka and then we'll train to Kyoto and then night bus to Tokyo. More budget friendly!
How much did we spend on airfare?
Manila to Osaka
Tokyo to Manila
Breakdown:
P2,248 (Manila-Osaka) +
P5,300 (11,190yen Tokyo-Manila converted today)
Total= P7,548
2. VISA
After booking our tickets, on the first week of June, we had to cram and work on our visa application. Ana had been to Japan na, so I decided to just apply sa agency where they got their visa before. She told me that's where Tricia Gosingtian also applies for visa. And you know how often Tricia goes to Japan, so I know the agency must be good.
List of requirements!
What if you're a freelancer and you don't have an ITR? What documents should you pass?
1. PSA Birth Certificate - must be latest. I ordered mine online and just paid P300 thru my VISA debit card. It was delivered to my apartment 3 days later! So efficient and hassle free. ;)
Order here: http://nsohelpline.ph/order-now
2. Passport - 6 months validity. Had mine renewed at DFA-Alimall. Booked an appointment online more than 1 month before the given date. The whole process just took 30 minutes! Tip: Choose a date that falls after a long weekend 'coz less people!
3. Passport Photo - must be 4.5 x 4.5cm & with white background! Had mine taken sa Alimall. I specifically requested for Japan visa photo. They know na agad. Got my photos after 30 minutes. Paid P110 for my photos.
4. Bank Certificate - even if I had a guarantor, I still submitted my own bank certs. I made sure it has P100k in it (thanks mother & father for lending me money hahaha). I think it also helped in the approval. Bank cert fee is P150.
5. Guarantee Letter by Sponsor - in my case, my sister! Make your guarantor sign it para hindi sayang.
Download sample here: visa.friendshipmanila.com/log.doc
6. Affidavit of Support & Guarantee - this one should be notarized and signed by the guarantor. Email or message me if you want a sample. :)
7. Guarantor's ITR - could be xerox copy
8. Guarantor's Certificate of Employment - include name of company, position and monthly salary.
9. Payslip - not necessary but could also help
10. Guarantor's Bank Certificate - thanks sis!
11. Print out of plane tickets & accommodations - to show the Japan embassy that you have no plans to stay there.
12. Printed itinerary - supporting document to show them you're only there as a tourist.
Upon completion, Ana and I headed to Friendship Travel & Tours office in Dusit hotel, Makati to submit them. We paid P1,200 processing fee. Processing takes 2-7 days. In our case, we got a call after 2 days that they've been approved and ready for pick-up. Woohoo!:) I think it helped din na Ana and I applied together (we submitted the same tickets, itinerary & accommodations) and we indicated in our forms that we're freelance bloggers. ;)
| MANILA | ( MON to FRI 08:30-18:00 SAT 08:30-12:00 ) |
| Address | 3F Dusit Thani Manila Ayala Center Makati city Philippines 1226 |
| Phone | 893-8180 / 810-9622 ( Tagalog/English ) / 840-1060 ( Japanese ) |
| FAX | 818-8978 or 892-8899 |
| visa@friendshipmanila.com ( English ) info@friendshipmanila.com ( Japanese ) | |
| Cell phone | 0917-548-1810 ( Globe ) |
3. ACCOMMODATIONS
OSAKA
Pros:
*Walking distance to Dotonbori & Namba.
*Family Mart at the corner
*Secured building
*Close to the city center but not noisy
*Vending machine outside the building
*Has kitchen and utensils
*Room slippers & towels
*Provided toiletries
*Has extra blankets and pillows
Cons:
*Late check-in. As in after 3pm. :(
*Early check-out, 11am.
*Weak wi-fi signal (pocket wifi)
You can see on the map that it's close to Dotonbori and the Glico man! :)
Total price varies depending on number of people staying.
Total = P4,080 (per night for 3 people)
KYOTO
Kyoto was not that familiar so we booked a place near the train station (this was not that near pala! Mejo 10 minutes walk). The guesthouse was easy to find though. I just used this map for navigation.
Pros:
* Near Lawson convenience store.
* Quiet neighborhood
* Legit Kyoto neighborhood experience
* Authentic Japanese style rooms.
*Vending machines out in the streets.
*Has coffee maker, kettle & ref.
*House & room slippers
*Provided toiletries
*Has extra blankets and pillows
*Has receiving area / common area.
*Has books, magazines and Wii for entertainment.
* Staff are in-house & helpful.
*Cozy toilet but problematic bidet.
Cons:
*Late check-in. After 4pm.
*Early check-out, 11am.
*10 minutes walk to Emmachi train station.
*No restaurant or food places near the guesthouse.
*No pocket wi-fi.
*Not that clean & sanitary.
* Sheets and room were not that clean. Had insect/bed bug bites after.
* No towels provided. There is a towel in the closet but it looked used haha.
*Can't talk too loud because rooms are separated by thin dividers.
* Bathroom is on the 1st floor, while rooms are on the 2nd. This might be an issue for those who has an active bladder. Haha.
* Aircon is a little noisy.
* On our last day, staff slept in the common area so we couldn't use the kettle and ref coz their cushion was blocking the table.
*Restroom needs to be sanitized and cleaned more often.
Total = P4,683 (for 2 nights)
TOKYO
This might be one of our best finds in Tokyo! Ab's place is in Shibuya, walking distance to the train station and Shibuya crossing. It's in the heart of the city but is located in a quiet street. For the price, it's quite a gem!:)
MAP:) Landmarks are H&M and Don Quixote!:) If you see Don Quixote, turn left:)
Pros:
* Near Lawson convenience store. A few steps away.
* Located in the city but quiet neighborhood
*Vending machine outside the building.
*Has so much free stuff inside the place! Ab has a closet full of all sorts of things-- umbrellas, shopping bags, paper bags, scissors, pens, etc.
*House & room slippers
*Provided toiletries
*Has extra blankets, towels and pillows
*Secured building
*Clean toilet and has heater.
*Early check-in and late checkout!!! We were allowed because they had no booking the day before and after. Yipee!
*There are a lot of food places near the building. There's one beside it actually.
* Has a balcony.
Cons:
*Pocket wi-fi was super slow.
*Main bed is an air bed. It made me dizzy haha. Sarah and I ended up sleeping on the floor. Good things they provided free mattress! Had a nice sleep.
TOTAL = P10,247 (for 3 nights)
Grand Total = P4,080m+ P4,683 + P10,247 = P19,010 / 3 = P6,337
4. PACKING
I would like to consider myself a light packer. I think I aced this super skill when Nico and I went on a 20-day adventure across Asia last year. Before, I tend to pack everything I set my sights on-- always panicking, always FOMO. But now, I learned to edit my outfits and bring only what's necessary. I also do dress rehearsals so I won't overpack clothes. I also bring footwear which goes well with all the outfits I prepared. Maximum 2 pairs. For this trip I only brought one! My new all-white Skechers rubber shoes. Best decision ever!
I wore it with pants, shorts, skirts, dresses!
For my clothes, I prepared 10 sets-- 1 for each day + a few extra just in case. Since it's rainy season na, I also brought 2 jackets -- 1 for the rain and 1 for aura aura lang. All of the pieces I brought with me are lightweight. I was able to roll all of them to make more space in my luggage. Nailing this whole packing thing! I'm such a mother packer! Hahaha.
For my toiletries, I brought travel size shampoo, conditioner, lotion (l'occitane which I got from my Ascott staycation haha), The Body Shop olive body wash, toothbrush & toothpaste. I also brought a few makeup. In short, less weight and not that bulky! Yipee!
5. ADDITIONAL BAGGAGE ALLOWANCE
Ana, Sarah and Pax
I had to start packing first before buying additional baggage allowance so I'd know my limit. Bought 15kg going to Japan & 20 kg going home. My total weight is 10.8kg when I left Manila and 16kg when I went home! Should have bought 15kg nalang pauwi! I could have hand carried some items. Oh well. It's also more expensive to buy allowance a few days before your flight huhu. See comparison below...
Total above includes airfare already. :) We only paid P2,330 or P1,165 each for 15kg additional baggage allowance
Here's the breakdown. ;)
For Tokyo-Manila, rate was 4000yen for 20kg & 5000yen for 30kg.
If you book your baggage allowance with your ticket it's just P895 for 15kg & P1,010 for 20kg. I could have saved more or less P1,000.
My TOTAL = P1,162 + P1,872 (4000yen conversion) = P3,034
6. NIGHT BUS TICKET to TOKYO
what factors did I consider when choosing? Routes (Had to be Kyoto to Shinjuku which is the one closest to Shibuya), toilet and luggage provision. Some of the cheap ones don't have luggage storage and no toilets. Chose Eagle Bus and booked a one way ticket from Kyoto Kamogawa to Shinjuku for 6,800yen or P3,300. It's pricier than the rest but there's always a price for convenience. I love its 3-row separated seats. Each seat has a curtain for privacy, blanket, pillow, socket, night lamp, reclining seat with foot rest and a toilet inside.It was super comfortable and it's like having your own room inside. Totally worth it!
Another site where you can book seats: http://nightbusjapan.com/
7. PHOTO STORAGE
photo from www.cnet.com
I also use my iPhone to take photos! Especially when it's raining and I had to put the camera in my bag. Whenever I run out of space, I just transfer the photos to my Sandisk iXpand Flash Drive (which I bought from Shopee) or upload it on my Shoebox App!
Download Shoebox App on your phone!
It automatically downloads your photos as long as you have wi-fi connection. In Osaka and Kyoto, I was able to download my photos because of the fast wi-fi connections in our Airbnb and public places. In Tokyo, I had to save my photos using my Sandisk flash drive coz we didn't have a fast wi-fi connection at home. also had limited wi-fi in public areas.
I deleted na my Shoebox App on my phone to save space. Don't worry, the downloaded photos will stay there forever (I hope). Then I opened the Shoebox website using my laptop, signed in and downloaded all my photos from the trip! :)
No need to bring your laptop na when you travel just to transfer photos and free up some space on your SD card or phone. Yipee.
8. MONEY CHANGER
Click here for their other branches:
9. CREDIT/DEBIT CARDS
For shopping emergency purposes, I also brought my Unionbank Visa GetGo debit & credit cards with me! Thank God, I didn't have to use them. Haha. I used them though when I booked and paid for our accommodations, extra baggages & our bus tickets online and I earned GetGo points in return! Woots! I shall use them to book plane tickets. Hoho.
To know more about these amazing cards, click here:
10. POCKET MONEY
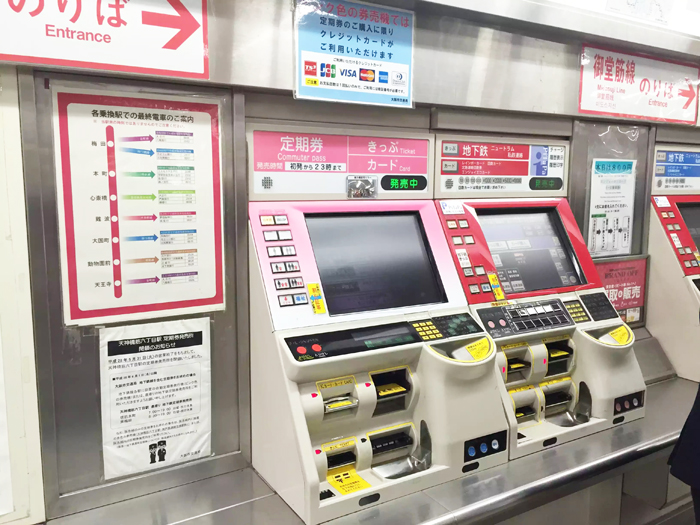
TRANSPORTATION - it's best if you just buy the unlimited passes especially if you have a jampacked itinerary. In our case, we bought the 3-days unli Tokyo Subway pass which was super sulit! It's 1,500yen or P700. We were able to go to different places without having to line up and buy a ticket.
We bought the 3-day ticket or the green one. So convenient!
You must always have coins! The machines also accepts 1000yen.
Trains in Japan could be really confusing. They have a gazillion train lines! Good thing they have a CALL for HELP button and someone was always there to assist. Lumalabas sila sa small silver door na yan on the left side. Kulet!
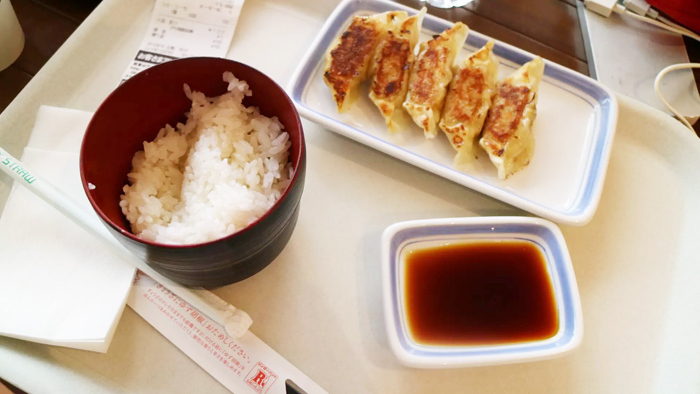
For example, this kiosk in a mall in Osaka. I got the 250yen gyoza! That's only P120.
Plus rice & drinks, another 250yen. Total is 500yen or P230. Not bad!
Kiyomizu Dera's entrance fee is just 300yen or P130 :)
I skipped on the expensive activities like the Robot show in Tokyo that Sarah & Ana went to and also the authentic Japanese dining experience in Kyoto. That's 6,800yen & 5,000yen respectively. I think the most expensive activity we did was the cultural show in Gion Corner at Kyoto for 3,150yen. Worth it, though! Got to see real Maikos! :)
Shopping - I also did a little shopping, mostly in Tokyo! I made sure that I only buy pieces that are on sale, or those that I wouldn't be able to find or see in Manila. Most of the shops in Tokyo are thrift shops na pinasosyal so I skipped those 'coz I know I'd be able to find something similar here at a much cheaper price.
Avail of their TAX FREE services and refunds! Always bring your passport with you!:)
Loved shopping at GU (Uniqlos sister brand), Monki, Flying Tiger & Harajuku!:) I mostly bought items not more than 1000yen or P500 each. Was able to buy a pair of shoes and nice pants from GU for 590yen or P280 each!!! Waaah. I also did my pasalubong shopping at Don Quixote (24-hour store which sells everythanggg) near our condo. :)
Let's summarize my expenses:
Airfare - P7,548
VISA - P1,200
Accommodations - P6,337
Additional baggage allowance - P3,034
Kyoto to Tokyo night bus- P3,300
Airport Tax - P1,620
Terminal Fee - P750
Pocket Money - P26,000
__________________________
Grand Total = P49,789
This ends my first Japan post. Hope it was fun for you to read as it was for me to re-live. :) My next post will be Osaka Day 1! Thanks for reading! :)
Affudavit of support and guarantee - can you pls email that to me.
ReplyDeleteWhat if I have a valid AU visa will I still get a Visa for Japan? Kasi in Taiwan, certificate nalang kukunin from the website.
nakakamiss! and yes sa kyoto ko na nalaman ha! hahahaha
ReplyDeleteOMG I love this! I travel for convenience in Japan so not too budget but I would love to try the night bus! Laki ng savings than the bullet train e. But the bullet train experience was also amazing may free view pa ng Mt. Fuji :) Can't wait to read your future Japan posts!
ReplyDeleteI like the visa guide :) very helpful for freelancers like us :)
ReplyDeleteHi, Aisa! Thank you for the detailed blog! Especially on the part about the visa processing. Glad that you brought that up because my husband and I are also freelancers, though we already have our ITRs. Looking forward to more posts of your travel to Japan.
ReplyDeleteHi Aisa! Your blog post was really helpful. I'll be going to Japan this June and I'm really pushing for a budgeted trip. Thus I have few questions for you...
ReplyDelete1. How was the weather when you went there in June?
2. How much do you think should I allot for food?
3. Was the Tokyo 3 day pass really sulit? Didn't you have to take a JR line (cos I believe di sya covered nun). I found a Tokyo Combination ticket 1500yen for 1 day, I'm not sure if sulit ba sya or not...
Also, after our trip, I will blog about it for sure. I really like how you do your blog post, so I might copy the structure/flow of your post. Hope that's fine with you. If not, that's also okay. :)
[dreiajavier.wordpress.com]
Hi Dreia!
Delete1. It was rainy when we were there. We just brought raincoats and I brought a rain jacket with hood:)
2. For food you can allot P500-1000 per day. :)
3. If you're itinerary involves lots of train rides then it is sulit! Not so much of an expert re Japan railway tickets it confuses me a lot! :)
And yes of course, you can copy the way I blog! It will help a lot of people plan their trips. :) Super thank you for reading my blog <3
Reading blog posts about Japan makes me want to visit Japan again!!!
ReplyDeleteSuch a beautiful country! <3
We also went on an 11 day trip to Japan Oct last year and spent around 50k all in (without shopping) including the 7 day JR rail pass.
sad that there's not enough info about food
ReplyDeleteI'm such a huge travel fan and planning on our 1st trip to Osaka in June of 2018. I'm so glad I bumped into this blog because I feel all the research I made was confirmed with the pics. I feel like this could very well be my entire guide.
ReplyDeleteThank you so much!